Disclaimer: This is the English avatar (not exactly a translation, though close) of a Spanish-language blog. I am not a native English speaker, so I would ask readers to bear kindly with this attempt (possibly too bold) and the mistakes it will entail and to accept the apologies for them I offer in advance here.


lunes, 6 de abril de 2009

My Way, or disregarding advice...

Seized by a fit of builder angst, I called Xabier with silly questions about the lashing of deck beams. A frequent procedure is to place the lashing on the fore edge of the beam on one side and on the aft edge on the other. Well, in my case rib mortise locations prevented that for a good number of beams. The idea of lashing on the same edge on both sides did not appeal to me, as it evoked images of beams slowly removed from their postions by the cord's constant pull in one direction. I thought that by making two holes on the beam, instead of one I could center the lashings and avoid that, but wanted to check with an expert first. Xabier sort of favored the traditional arrangements, even if it meant lashings on the same edge. I said ok.

However, when the time came and, drill in hand, I approached the qajaq, an evil, innovative spirit must have possessed me. I suddenly found myself going with my idea and drilling two holes on the beams (sorry for bothering you for nothing, Xabier...). The pictures show the resulting lashing on the ash isserfik. I am now convinced I will pay for this folly.

And that was not all. Prey of the fever of the alternative, I tied figure-eight knots instead of half hithches for all the stopping knots and the knots around the bitter end of the Eskimo knots in all the lashings. In this case however, I seem to recall that Xabier said he had done something similar and the figure-eight are supposed to be a better stopping knot.

In any case, now there are nine deck beams in position. Two to go.

domingo, 5 de abril de 2009

Bigfoot and the qajaq


The qajaq's deck is missing the masik and deck beam #5, but otherwise complete, lashings and gunwale joining included (still "terrific job" simetry-wise. Pics in some entry to come soon). That seemed a good time to play around with the positioning and height of those remaining pieces to ensure not so much comfort, but that I'll be able to actually get into the boat and that subsequently remaining inside for a while will not be torture. I was quite worried (by now it should be clear that I am good at finding stuff to worry about...) that such a thing would require substantial alteration of the deck that would ruin the gorgeous lines of the boat.

It turns out that, by the well-known-and-not-terribly-frowned-upon cheats of moving the masik slightly forward and pushing the aft edge of the coaming a bit behind the fore edge of the isserfik I could have pretty much used the original height of the masik. However, in order to accommodate my feet while wearing some mukluks I really enjoy, the foot brace required spacers and the bow end of the foredeck stringers needed to be moved closer to the stem, probably laying upon deck beam #3. I don't really have big feet. Average leaning to smallish, actually, but, obviously, those of the original user were even smaller.

Once it was clear this modification was unavoidable, I also decided to raise the masik slightly. I think the deck actually looks better that way and it should give me an extra bit of much appreciated comfort (and margin for error).

The picture shows the qajaq's original profile below and the one with the modified deck above. I must have compared them about a thousand times, not without some anguish. Perhaps it is just resignation (this has to be done if I actually want to use this boat) and self-deception, but I am slowly accepting that the aesthetic damages might be relatively minor.

jueves, 2 de abril de 2009

Just Like that ... (Santander I)


... only bigger and, perhaps of a lighter color, is how, in my more optimistic moments, I expect my qajaq-to-be to end up looking.

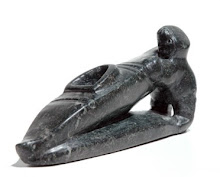
What you see above is a miniature replica of the same boat I'm building, the DNM lc. 43 (KOG plate #31). It belongs to the growing qajaq collection of naval miniaturist extraordinaire, fellow paddler, angler, cook (his mahi mahi sashimi has become a bit of a legend...), SOF builder (what he paddles in the pic below) and nice guy, Rafa.

Rafa is a true expert in traditional sailing craft from the Mediterranean coast, particularly llaguts and the like, and he's reproduced at reduced scale quite a few of them. Then, he discovered traditional qajaqs and turned his talent to them, producing outstanding miniatures of different types at a truly remarkable pace. He brought them to the past kayaking gathering in Santander and checking out the latest additions, chatting about design features and the reasons behind them and generally admiring the beautiful little boats was one of the good moments of the long weekend.

As usual, I didn't make the pictures. They were taken by Javier, a new paddling friend I met in Santander. Another highlight of those days.

miércoles, 25 de marzo de 2009

Ship shape


As, I guess, has happened to all first-time qajaq builders before, I found it pleasantly surprising how, all of a sudden, two long planks of wood suddently start looking boat-like when put on the forms.

Moreover, I did the string thingy to check for simmetry and alignment and I found I was within Cunningham's "terrific job" range. I wouldn't have taken any bets on that.


Not that everything went perfectly well and smooth, of course. The MDF forms did give some problems. Midly gloomy predictions by master craftsman Xevi (check his blogs, the qajaq, the umiaq and... well the other things... Very much worth it) tended to come true. A couple of the middle forms had one of their external arms broken and the bow and stern forms did tend to spread at the top (next ones, if there are next ones, will not be open in the middle).

Fortunately, friend and fellow builder Alfonso (whose qajaq and paddle building blog I also recommend heartily) had brought to my attention the contraption in the picture below when my project was little more than worries and a long list of potential problems in my mind and how to deal with a changing gunwale flare was prominent among them. It is basically two pieces of wood joined on top and bottom by Spanish windlasses, thus allowing for separate adjustment of pressure on the gunwale's upper and lower edge.


It looks like it was inspired by (or provided itself the inspiration for) some instrument of torture, but, in any case, the thing has worked very well in persuading the gunwales to take the desired, varying angles. I really like it. If there are more qajaqs in the future, I think I'll go with simpler, sturdier forms coupled with this thing. Thank you, Alfonso.

The tendency to open of the end forms was cured using cam buckle straps around them. The straps also proved generally useful to help hold the overall shape. Oh, I also did the kerf cutting magic so the gunwales' ends make proper contact. And started cutting and adjusting the first straight deck beam (rasps and files, what a great invention...).

So, there is progress. I have something I can look at and think of a qajaq and I have learned for the future.

I have almost forgotten the moments of panic by now.

martes, 17 de marzo de 2009

Avasisartoq


The kayak I am trying to, more or less, replicate (Danish National Museum Lc 43) belongs, as the one above, to the type H.C Petersen called avasisartoq, which Harvey Golden considered largely equivalente to his Type IV in Kayaks of Greenland. Distinctive of the type are the gracefully raised ends. In my opinion, they contribute significantly to the elegance and beauty of the finer examples of the type which could well be the Greenlandic kayaks I find most aesthetically pleasing.


Of course, the raised ends have some consequences for the construction. You would either need rather wide boards to carve the gunwales in one piece or, as I did, you could glue pieces at both ends, where you need the extra wood. The pic above shows the additions for the stern.

And that's the finished product, bow...


...and stern


Besides adding wood, I've removed some too and thus shaping of the gunwales' profile has been completed. I still need to bevel their inner edges so the skin can lay flat on the resulting surfaces. but that will have to wait for a few days: tomorrow I leave for a long (really long) weekend of paddling in Santander, in the Bay of Biscay (might not see comments to this entry for some time).

And I will be using a new kayak...

domingo, 15 de marzo de 2009

Edge Split


It's in my character to worry about stuff that can go wrong when trying to build something (and I understand that the first qajaq build has done just that to guys tougher than yours truly). Every now and then, I breathe deep and repeat the Construction Mantra "Keep building and it may not be a problem after all". Kind of works a reasonable number of times, but not with the problem shown in the picture. That one has me worried for real.

It's, I guess, what you call "edge split" or "grain runout" or some other technicality, wood fibers separating along the grain direction at the piece's edge (outer upper edge of the right gunwale in this case) or something like that. In any case, I understand it weakens the piece, it unfailingly drives splinters in my hands whenever I lower my guard and it's mighty ugly. I also believe it happens in a bad location, the central part of the boat, where the gunwales will bend the most and where shaping them is not going to take away any more wood from the upper edge.

I am wondering how to deal with it. I am considering liberally pouring epoxy thickened with sawdust or Titebond III in the cracks, then apply some/a bit of pressure and see what happens. Of course, I worry about what that will do to the gunwales flexibility...

sábado, 14 de marzo de 2009

Plunge Router!


I had never used a plunge router. In fact, I had never seen one live and up close till now that Xabier lent me his router to carve the mortises for the qajaq's ribs. Thankfully, it already came with the settings, depth and bit size, I needed. Nonetheless, I'll admit I was a tad daunted by the contraption.

Anyway, I practiced a bit on a scrap piece, then breathed deep and got to work. It took a me a morning to get the 38 mortises done and a reasonable number of them are actually quite straight. I am in total awe of this thing. I don't even want to think if I had had to do this with a normal drill and a chisel... Thank you, Xabier. Oh, and whatever may seem in the picture, your router was not about to fall down. There was a clamp securing it.

Again, I've learnt things as I worked. By mortise 20 or so, I decided that time spent securing the gunwales to the sawhorses through the use of extra blocks of wood and clamps was well worth it, while fixing a clamp to the gunwales to act as a stop (and taking it off and reattaching it in a new position for each hole) was not. Too late for the previous 19 mortises...

By mortise 30, I became convinced that attaching a block of wood on one side flush with the gunwales' edge to increase the support base for the router was also time well spent. Again, late for some 29 previous mortises, but, should there be more qajaqs, not too late for the mortises in them.

Worry of the day (hour...): My rib stock is 5 mm thick, same as the router bit's diameter. Obviously, the mortises ended up a tiny bit wider than that and the fit with a trial piece of rib was not vey tight in some cases. I suppse that soaking and steaming the ash may make it thicken and the slightly loose fit may actually turn out helpful. Otherwise, I suppose that some really thin shims may help.